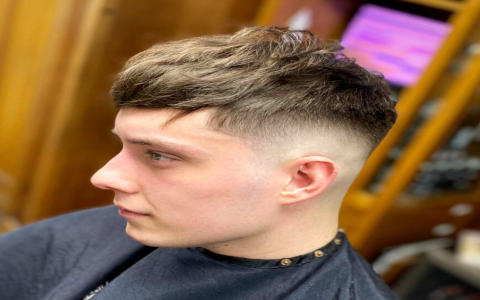
Okay, so I’ve been seeing this “short undercut” style all over my Pinterest and decided, “Why not?” My hair was getting kinda long and shapeless anyway, so it felt like the perfect time for a change. I’m no professional, just a regular dude with some clippers and a whole lot of hope.

Prepping the Canvas
First things first, I washed my hair. Clean hair is easier to work with, and you get a better sense of the actual length and texture. Then, I towel-dried it, leaving it just a bit damp. This helps with the clipping, at least in my experience. Don’t want it soaking wet, but not bone-dry either.
The Undercutting Begins
This was the scary part. I sectioned off the top part of my hair – basically everything above my temples and the crown of my head. I used a couple of those claw-clip things my sister has lying around. The goal was to keep that hair completely separate from the sides and back.
Then, I grabbed my clippers. I have one of those adjustable ones, so I set it to a pretty short length – I think it was a #2 guard? I figured I could always go shorter later, but I couldn’t magically make my hair grow back if I messed up. Starting at the sideburns, I slowly moved the clippers upwards, following the natural curve of my head. I kept checking in the mirror to make sure I wasn’t creating any weird patches or lines.
- Take it slow: Seriously, don’t rush this. Short strokes, frequent checks.
- Keep it even: I tried my best to keep the same pressure and angle all the way around.
- Mirror, mirror: Use a hand mirror to check the back. It’s tricky, but you gotta see what you’re doing.
I repeated this process on the other side and then very, very carefully around the back. The back is the hardest part, no doubt. I used a hand mirror to try and see what I was doing, but it was still mostly guesswork. I just tried to keep the clipper moving smoothly and evenly.
Blending (or Attempting To)
Once the sides and back were buzzed down, I took out the clips holding the top section. Now came the “blending” part. I’m not gonna lie, this is where things got a little dicey. I tried to use the clippers with a longer guard to sort of fade the short hair into the longer hair on top, but it’s not as easy as it looks in those YouTube videos.
I ended up mostly just using scissors to trim the hair where the short and long sections met. I snipped away at any bits that looked too bulky or uneven. It wasn’t perfect, but it was good enough for me. A little bit of unevenness just adds to the “I did this myself” charm, right?
The Final Touches
After a final check in the mirror (and a bit more snipping), I washed my hair again to get rid of all the loose clippings. Then, I styled it with a little bit of product – just some pomade to give the top part some texture and hold. And… that was it!
It’s definitely not a salon-quality haircut, but I’m pretty happy with how it turned out. It’s a big change from my usual style, and it feels a lot lighter and cooler for the summer. Plus, I saved myself some money by doing it myself. Would I recommend it? If you’re feeling adventurous and don’t mind a little bit of imperfection, go for it! Just remember to take your time and don’t be afraid to ask for help (even if it’s just from a YouTube tutorial).


